部署 Cobbler 2.8.5
Cobbler 简介
Cobbler 作用
Cobbler是Linux安装服务器可以快速设置网络安装环境、具备web管理界面
ISO文件归档下载
部署前准备
文章以CentOS7.9部署V2.8.5版本为例进行示范
cobbler2.8.5已经验证能够部署的系统
- rhel6系列(已经验证OK)
- rhel7系列(已经验证OK)
- rhel8系列(已经验证OK)
- rhel9系列(镜像文件是没有问题的,但是安装的时候会有报错,目前还未解决)
YUM源准备(必须有epel和Base源)
bash <(curl -sSL https://linuxmirrors.cn/main.sh)关闭防火墙和SELinux
systemctl disable firewalld.service
systemctl stop firewalld.service
sed -i 's/^SELINUX=.*/SELINUX=disabled/g' /etc/selinux/config
关闭了selinux需要重启服务器生效
rebootCobbler 部署
Cobbler 组件安装
Centos7(其余的软件会作为依赖安装)
yum install -y dhcp tftp-server xinetd debmirror pykickstart cobbler cobbler-web组件作用简介
- cobbler #基础组件
- cobbler-web #web组件
- debmirror #镜像管理工具
- pykickstart #检查cobbler配置文件语法
- httpd #发布镜像
- syslinux #配置引导文件(生成pxelinux.0)
- tftp-server #为PXE的客户端提供引导文件
- dhcp #为PXE的客户端提供IP地址、告知tftp的服务地址
Cobbler 目录文件简介
rpm -ql cobblerCobbler 目录文件结构
| 目录/文件路径 | 说明 |
|---|---|
/etc/cobbler |
配置文件目录 |
/etc/cobbler/settings |
cobbler主配置文件 |
/etc/cobbler/dhcp.template |
dhcp服务的配置模板 |
/etc/cobbler/tftpd.template |
tftp服务的配置模板 |
/etc/cobbler/rsync.template |
rsync服务的配置模板 |
/etc/cobbler/iso |
iso模板配置文件目录 |
/etc/cobbler/pxe |
pxe模板文件目录 |
/etc/cobbler/power |
电源的配置文件目录 |
/etc/cobbler/users.conf |
web服务授权配置文件 |
/etc/cobbler/users.digest |
用于web访问的用户名密码配置文件 |
/etc/cobbler/dnsmasq.template |
dns服务的配置模板 |
/etc/cobbler/modules.conf |
cobbler模块配置文件 |
/var/lib/cobbler |
cobbler数据目录 |
/var/lib/cobbler/config |
配置文件 |
/var/lib/cobbler/kickstarts |
默认存放kickstart文件 |
/var/lib/cobbler/loaders |
存放的各种引导程序 |
/var/www/cobbler |
系统安装镜像目录 |
/var/www/cobbler/ks_mirror |
导入的系统镜像列表 |
/var/www/cobbler/images |
导入的系统镜像启动文件 |
/var/www/cobbler/repo_mirror |
YUM源存储目录 |
/var/log/cobbler |
日志目录 |
/var/log/cobbler/install.log |
客户端系统安装日志 |
/var/log/cobbler/cobbler.log |
cobbler日志 |
Cobbler 主配置文件修改
生成密文密码
openssl passwd -1
设置root密码
sed -i 's|^default_password_crypted.*|default_password_crypted: "$1$Nrt/tXCR$BrRthh4tFphGyCunrGWzi/"|g' /etc/cobbler/settings
设置指定tftp服务IP地址
sed -i 's|^next_server.*|next_server: 192.168.200.10|g' /etc/cobbler/settings
设置cobbler服务地址
sed -i 's|^server.*|server: 192.168.200.10|g' /etc/cobbler/settings
cobbler接管dhcp(0为关闭 1为开启)
sed -i 's|^manage_dhcp.*|manage_dhcp: 0|g' /etc/cobbler/settings
cobbler接管tftp(0为关闭 1为开启)
sed -i 's|^manage_tftpd.*|manage_tftpd: 1|g' /etc/cobbler/settings
cobbler启动服务
systemctl enable --now httpd.service
systemctl enable --now cobblerd.servicecobbler可以将自身作为dhcp服务器为安装系统的客户端分发IP地址、也可以使用已有的dhcp服务器,为了首次同步成功这里统一将cobbler接管dhcp的功能暂时关闭
Cobbler 首次检查
可能每人的报错问题不同此处列举我的报错问题
cobbler check1 : change 'disable' to 'no' in /etc/xinetd.d/tftp
2 : Some network boot-loaders are missing from /var/lib/cobbler/loaders, you may run 'cobbler get-loaders' to download them, or, if you only want to handle x86/x86_64 netbooting, you may ensure that you have installed a *recent* version of the syslinux package installed and can ignore this message entirely. Files in this directory, should you want to support all architectures, should include pxelinux.0, menu.c32, elilo.efi, and yaboot. The 'cobbler get-loaders' command is the easiest way to resolve these requirements. #可以忽略(确保系统已经安装pxelinux)
3 : enable and start rsyncd.service with systemctl
4 : comment out 'dists' on /etc/debmirror.conf for proper debian support
5 : comment out 'arches' on /etc/debmirror.conf for proper debian support
6 : fencing tools were not found, and are required to use the (optional) power management features. install cman or fence-agents to use them #可以忽略解决 Cobbler 检查报错
报错1问题解决
cat << EOF | tee /etc/xinetd.d/tftp
service tftp
{
socket_type = dgram
protocol = udp
wait = yes
user = root
server = /usr/sbin/in.tftpd
server_args = -s /var/lib/tftpboot
disable = no
per_source = 11
cps = 100 2
flags = IPv4
}
EOF
报错3问题解决
systemctl enable --now rsyncd.service
报错4、5问题解决
sed -i 's|@dists=.*|# @dists=|' /etc/debmirror.conf
sed -i 's|@arches=.*|# @arches=|' /etc/debmirror.confCobbler 首次同步
再次运行检查
cobbler check1 : Some network boot-loaders are missing from /var/lib/cobbler/loaders, you may run 'cobbler get-loaders' to download them, or, if you only want to handle x86/x86_64 netbooting, you may ensure that you have installed a *recent* version of the syslinux package installed and can ignore this message entirely. Files in this directory, should you want to support all architectures, should include pxelinux.0, menu.c32, elilo.efi, and yaboot. The 'cobbler get-loaders' command is the easiest way to resolve these requirements.
2 : fencing tools were not found, and are required to use the (optional) power management features. install cman or fence-agents to use themcobbler首次同步
cobbler sync配置 DHCP 服务
Cobbler 接管 DHCP
修改dhcp模板文件
vim /etc/cobbler/dhcp.templatesubnet 192.168.200.0 netmask 255.255.255.0 {
option routers 192.168.200.2;
option domain-name-servers 223.5.5.5;
option subnet-mask 255.255.225.0;
range dynamic-bootp 192.168.200.200 192.168.200.250;
default-lease-time 7200;
max-lease-time 7200;
next-server $next_server;
class "pxeclients" {
match if substring (option vendor-class-identifier, 0, 9) = "PXEClient";
if option pxe-system-type = 00:02 {
filename "ia64/elilo.efi";
} else if option pxe-system-type = 00:06 {
filename "grub/grub-x86.efi";
} else if option pxe-system-type = 00:07 {
filename "grub/grub-x86_64.efi";
} else if option pxe-system-type = 00:09 {
filename "grub/grub-x86_64.efi";
} else {
filename "pxelinux.0";
}
}
#option dhcp-server-identifier 192.168.200.2; #生产内现有的DHCP服务器
}cobbler主配置文件开启dhcp接管
sed -i 's|^manage_dhcp.*|manage_dhcp: 1|g' /etc/cobbler/settings
重新同步
systemctl restart cobblerd.service
cobbler sync
启动dhcp服务
systemctl enable --now dhcpd.service
systemctl restart dhcpd.service使用现有 DHCP 服务器
修改dhcp配置文件
vim /etc/dhcp/dhcpd.confsubnet 192.168.200.0 netmask 255.255.225.0 {
option routers 192.168.200.2;
option domain-name-servers 223.5.5.5;
option subnet-mask 255.255.225.0;
range dynamic-bootp 192.168.200.2 192.168.200.200;
default-lease-time 600;
next-server 192.168.200.10; #指定cobbler服务器为tftp服务器
filename "pxelinux.0"; #指定启动文件名称
max-lease-time 7200;
}启动dhcp服务
systemctl enable --now dhcpd.service
systemctl restart dhcpd.service其他相关服务配置
配置 TFTP 服务
确保tftp的站点目录存在引导文件(cobbler检查问题的过程中已经修了tftp的配置文件)
ll /var/lib/tftpboot/drwxr-xr-x 3 root root 4096 Mar 1 23:54 boot
drwxr-xr-x. 2 root root 4096 Oct 15 2019 etc
drwxr-xr-x. 2 root root 4096 Mar 1 23:54 grub #UEFI启动菜单目录
drwxr-xr-x. 7 root root 4096 Mar 1 23:54 images
drwxr-xr-x. 2 root root 4096 Oct 15 2019 images2
-rw-r--r--. 2 root root 26140 Oct 31 2018 memdisk
-rw-r--r--. 2 root root 54964 Mar 1 23:54 menu.c32
drwxr-xr-x. 2 root root 4096 Oct 15 2019 ppc
-rw-r--r--. 2 root root 16794 Mar 1 23:54 pxelinux.0
drwxr-xr-x. 2 root root 4096 Mar 1 23:56 pxelinux.cfg #BIOS启动菜单目录
drwxr-xr-x. 2 root root 4096 Mar 1 23:54 s390x
-rw-r--r-- 2 root root 198236 Feb 8 15:17 yaboot启动tftp服务
systemctl enable --now tftp.service
systemctl enable --now xinetd.service
systemctl restart tftp.service
systemctl restart xinetd.service客户端测试访问
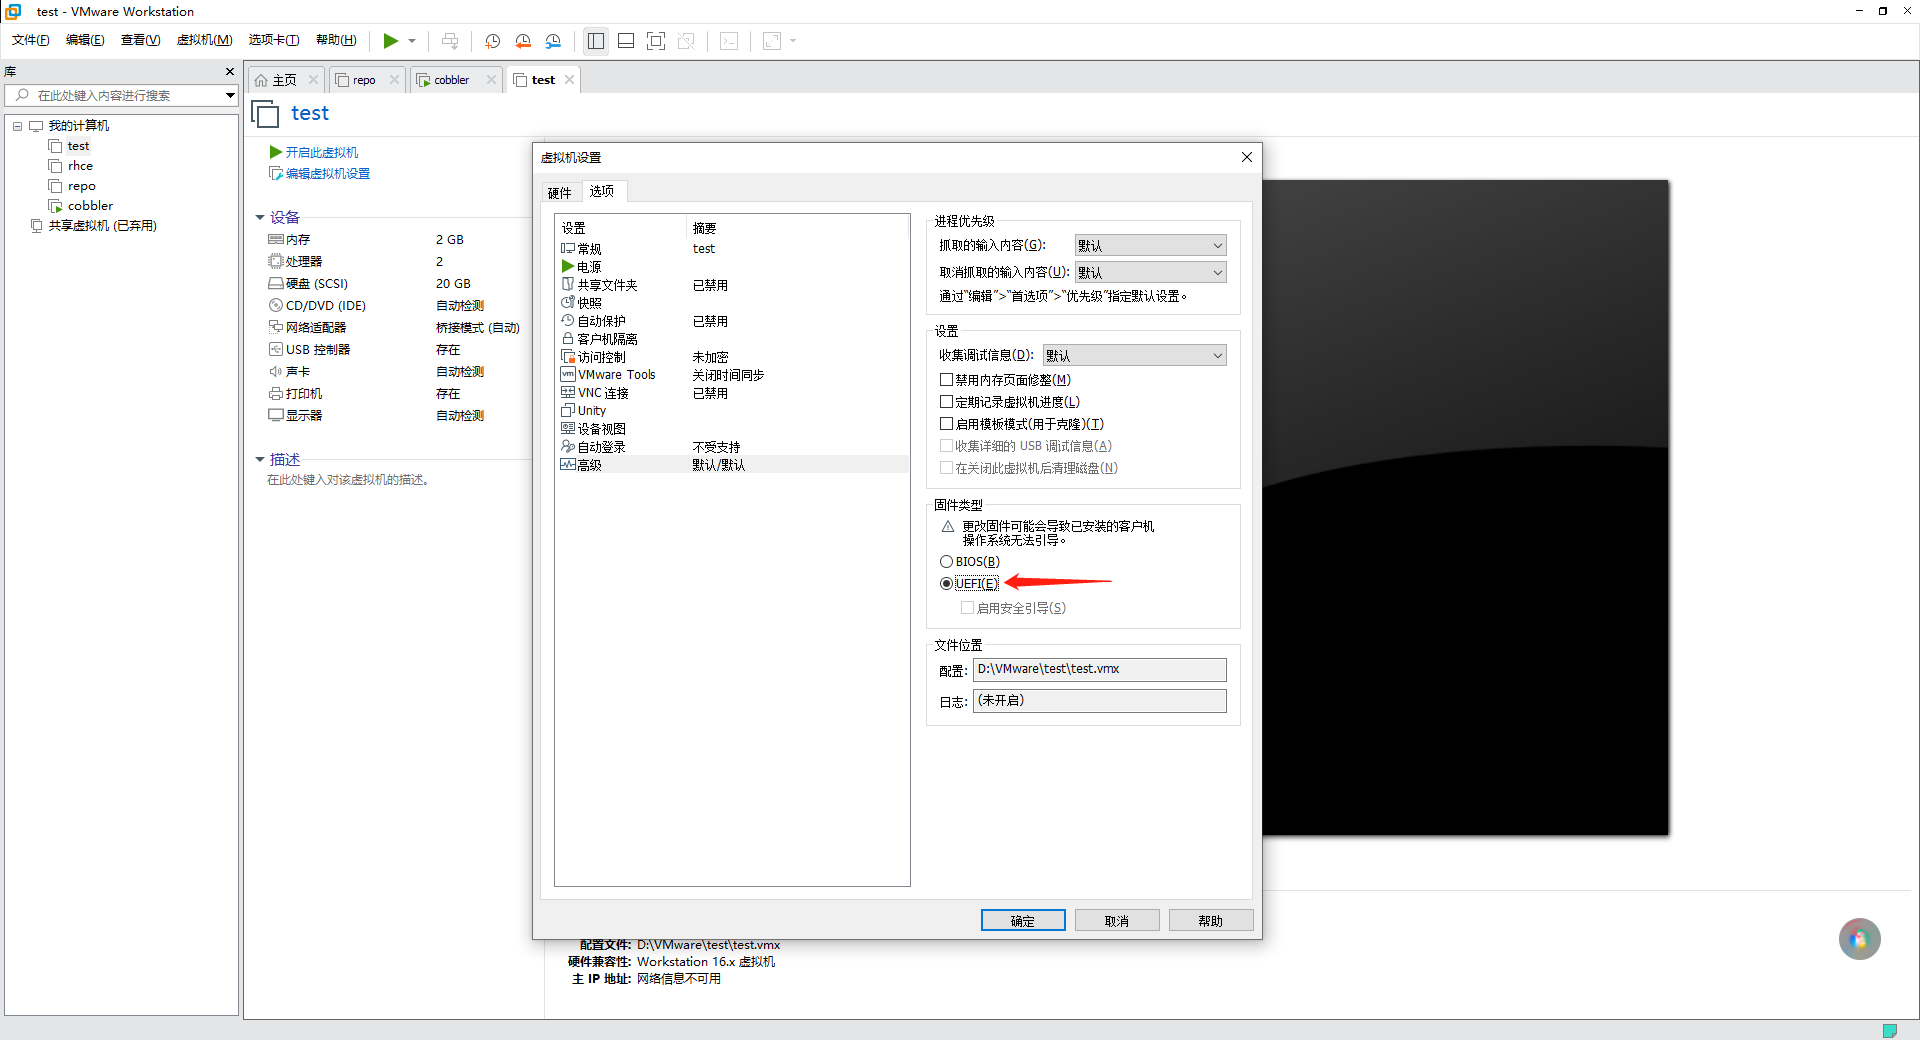
系统镜像挂载
Ubuntu镜像注意事项
不支持desktop、live版本(仅支持LTS server version版本)
推荐ubuntu-18.04-server-amd64
使用光驱加载Centos7的系统镜像
为后续cobble导入镜像做准备
mount -t iso9660 -o loop,ro /dev/cdrom /mntCobbler 使用
Cobbler 命令语法
命令语法
cobbler --help
cobbler <distro|profile|system|repo|image|mgmtclass|package|file> ...
[add|edit|copy|getks*|list|remove|rename|report] [options|--help]
cobbler <aclsetup|buildiso|import|list|replicate|report|reposync|sync|validateks|version|signature|get-loaders|hardlink> [options|--help]Cobbler 导入镜像
命令语法
cobbler import --helpUsage: cobbler import [options]
Options:
--arch=ARCH 镜像架构
--path=PATH 镜像导入路径
--name=NAME 镜像名称命令操作
cobbler import --name=CentOS7.9 --path=/mnt
cobbler import --name=Rocky8.4 --path=/mnt
cobbler import --name=Rocky8.5 --path=/mnt
cobbler import --name=Rocky8.6 --path=/mnt
cobbler import --name=Rocky8.7 --path=/mnt
cobbler import --name=Rocky8.8 --path=/mnt
注意cobbler2.8.5导入rhel9系列的镜像文件是没有问题的,但是安装的时候会有报错(目前还未解决)
列出对象
cobbler distro list
cobbler profile list
列出对象详细信息
cobbler distro report --name=CentOS7.9-x86_64导入镜像的过程
将光盘文件复制到/var/www/cobbler/ks_mirror目录下
并且自动生成apache的一个子配置文件/etc/httpd/conf.d/cobbler.conf将镜像发布出去http://IP/cobbler/
导入Cent0S6和CentOS7导入无异常
导入CentOS8的镜像会报错解决办法在文章下方cobbler导入镜像失败
导入Ubuntu 18.04之后的版本也是导入失败(非LTS版本可能支持的不友好)
CentOS 系统 KS 模板文件
备份默认ks
mv /var/lib/cobbler/kickstarts/sample_end.ks /var/lib/cobbler/kickstarts/sample_end.ks.bak
适配RHEL系列
curl -L https://drive.swireb.cn/d/Linux/Cobbler/v2.8.5/ks/sample_end.ks > /var/lib/cobbler/kickstarts/sample_end.ksUbuntu 系统 KS 模板文件
备份默认ks
mv /var/lib/cobbler/kickstarts/sample.seed /var/lib/cobbler/kickstarts/sample.seed.bak
适配Ubuntu18.04其余版本
curl -L https://drive.swireb.cn/d/Linux/Cobbler/v2.8.5/ks/sample.seed > /var/lib/cobbler/kickstarts/sample.seedUbuntu系统配置软件源模板文件
vim /var/lib/cobbler/snippets/late_apt_repo_configcat >/etc/apt/sources.list<<EOF
deb http://mirrors.aliyun.com/ubuntu/ bionic main restricted universe multiverse
deb http://mirrors.aliyun.com/ubuntu/ bionic-security main restricted universe multiverse
deb http://mirrors.aliyun.com/ubuntu/ bionic-updates main restricted universe multiverse
deb http://mirrors.aliyun.com/ubuntu/ bionic-proposed main restricted universe multiverse
deb http://mirrors.aliyun.com/ubuntu/ bionic-backports main restricted universe multiverse
EOF允许 root 用户 SSH 登录
sed -i 's|.*PermitRootLogin.*|PermitRootLogin yes|g' /etc/ssh/sshd_config && service ssh start安装Ubuntu系统之后执行的脚本模板文件
vim /var/lib/cobbler/scripts/preseed_late_defaultSNIPPET('post_run_deb')Cobbler 配置启动菜单
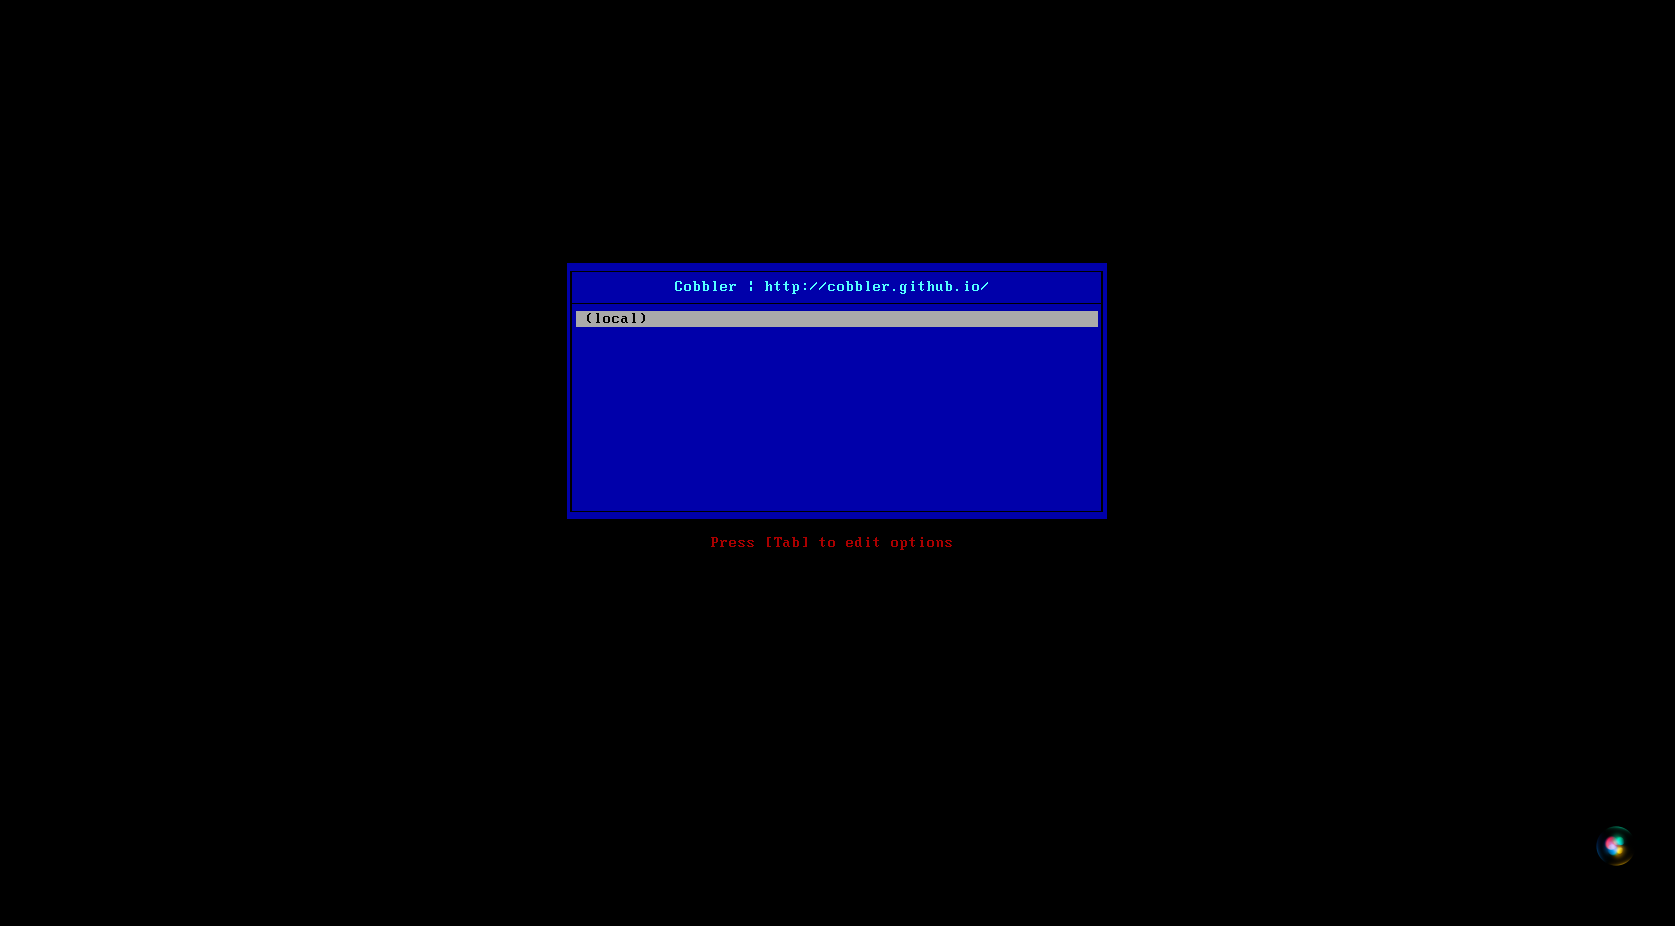
客户端配置
服务端配置 BIOS 启动菜单
修改启动菜单配置文件
vim /etc/cobbler/pxe/pxedefault.templateLABEL local
MENU LABEL (local)
MENU DEFAULT
LOCALBOOT -1cobbler重新同步
cobbler sync服务端配置 UEFI 启动菜单
手动下载UEFI启动的相关文件
wget https://drive.swireb.cn/d/Linux/Cobbler/v2.8.5/grub.tar.gz
tar xf grub.tar.gz -C /var/lib/cobbler/loaders
命令下载UEFI启动的相关文件(V2.8.5版本此命令已经失效)
cobbler get-loaders修改启动菜单配置文件
vim /etc/cobbler/pxe/efidefault.templatetimeout=6000 #修改启动菜单加时间(必须修改不然一闪则过)cobbler 重新同步
cobbler syncCobbler 配置 Web 管理界面
访问地址(必须为https)
默认访问用户
- 用户: cobbler
- 密码: cobbler
创建用户
/etc/cobbler/users.conf       #web服务授权配置文件
/etc/cobbler/users.digest     #用于web访问的用户名密码配置文件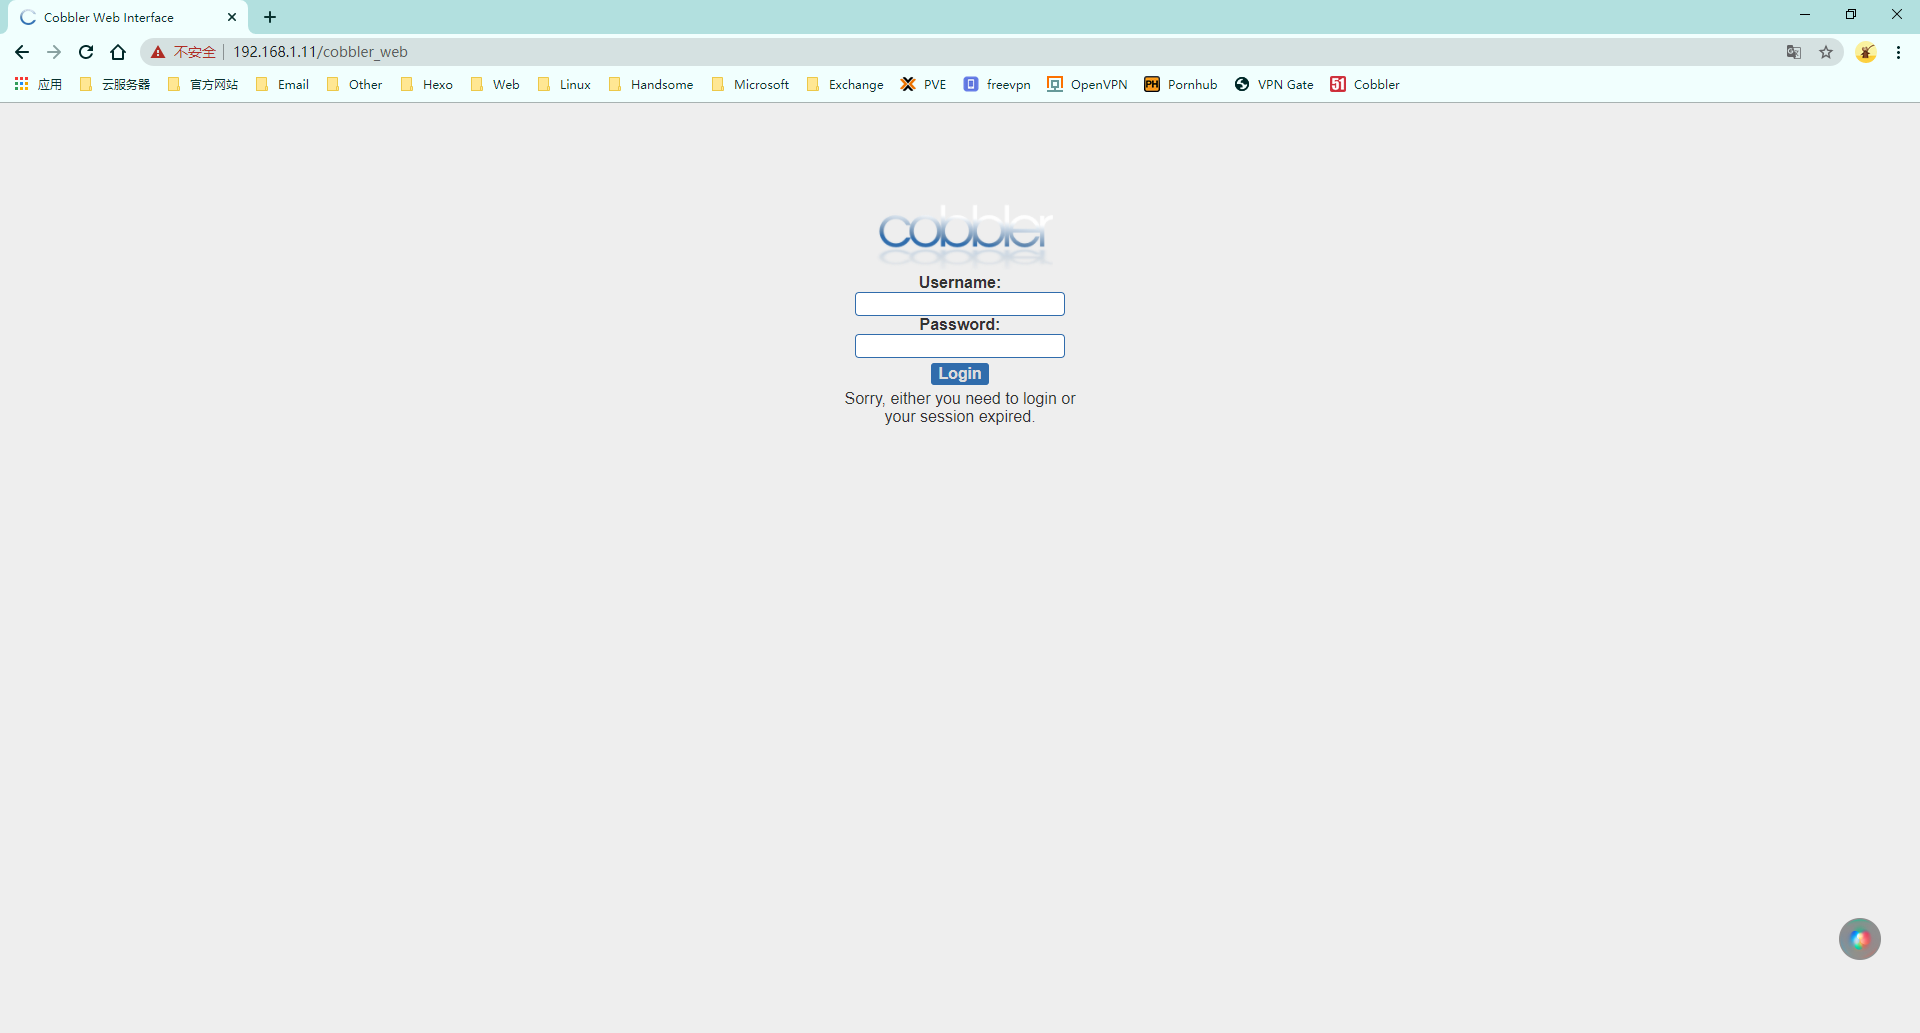
Cobbler 导入镜像失败
故障示意图
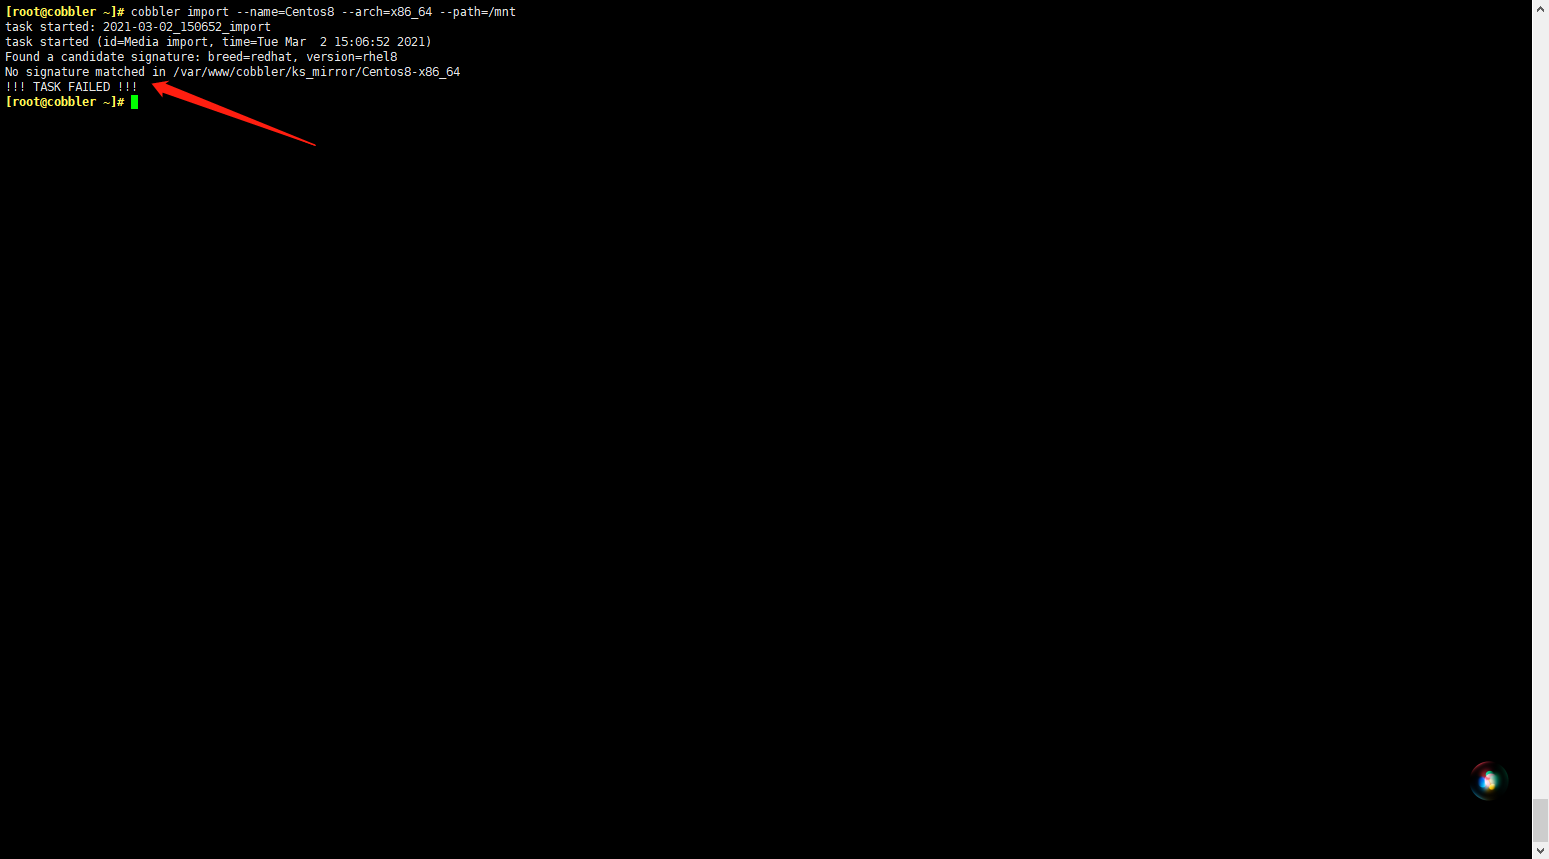
主要还是应为签名文件中不包括导入的系统镜像
更新签名文件
cobbler signature report #列出
cobbler signature update #更新
直接下载签名文件
curl -L https://cobbler.github.io/signatures/2.8.x/latest.json > /var/lib/cobbler/distro_signatures.jsonCentOS-Stream 解决办法
在rhel8的version_file键值对中添加centos-linux-release centos-stream-release
vim /var/lib/cobbler/distro_signatures.json"rhel8": {
"signatures":["BaseOS"],
"version_file":"(redhat|sl|slf|centos|centos-linux|centos-stream|oraclelinux|vzlinux)-release-(?!notes)([\\w]*-)*8(Server)*[\\.-]+(.*)\\.rpm",
"version_file_regex":null,
"kernel_arch":"kernel-(.*).rpm",
"kernel_arch_regex":null,
"supported_arches":["aarch64","i386","x86_64","ppc64le"],
"supported_repo_breeds":["rsync", "rhn", "yum"],
"kernel_file":"vmlinuz(.*)",
"initrd_file":"initrd(.*)\\.img",
"isolinux_ok":false,
"default_kickstart":"/var/lib/cobbler/kickstarts/sample_end.ks",
"kernel_options":"",
"kernel_options_post":"",
"boot_files":[]
},重启服务
systemctl restart cobblerd.serviceUbuntu18、Ubuntu19 解决办法
Ubuntu 18.10
"cosmic": {
    "signatures":["dists", ".disk"],
    "version_file":"Release|mini-info",
    "version_file_regex":"Codename: cosmic|Ubuntu 18.10",
    "kernel_arch":"linux-headers-(.*)\\.deb",
    "kernel_arch_regex":null,
    "supported_arches":["i386","amd64"],
    "supported_repo_breeds":["apt"],
    "kernel_file":"linux(.*)",
    "initrd_file":"initrd(.*)\\.gz",
    "isolinux_ok":false,
    "default_kickstart":"/var/lib/cobbler/kickstarts/sample.seed",
    "kernel_options":"",
    "kernel_options_post":"",
    "boot_files":[]
},
Ubuntu 19.04
"disco": {
    "signatures":["dists", ".disk"],
    "version_file":"Release|mini-info",
    "version_file_regex":"Codename: disco|Ubuntu 19.04",
    "kernel_arch":"linux-headers-(.*)\\.deb",
    "kernel_arch_regex":null,
    "supported_arches":["i386","amd64"],
    "supported_repo_breeds":["apt"],
    "kernel_file":"linux(.*)",
    "initrd_file":"initrd(.*)\\.gz",
    "isolinux_ok":false,
    "default_kickstart":"/var/lib/cobbler/kickstarts/sample.seed",
    "kernel_options":"",
    "kernel_options_post":"",
    "boot_files":[]
},
Ubuntu 19.10
"eoan": {
    "signatures":["dists", ".disk"],
    "version_file":"Release|mini-info",
    "version_file_regex":"Codename: eoan|Ubuntu 19.10",
    "kernel_arch":"linux-headers-(.*)\\.deb",
    "kernel_arch_regex":null,
    "supported_arches":["i386","amd64"],
    "supported_repo_breeds":["apt"],
    "kernel_file":"linux(.*)",
    "initrd_file":"initrd(.*)\\.gz",
    "isolinux_ok":false,
    "default_kickstart":"/var/lib/cobbler/kickstarts/sample.seed",
    "kernel_options":"",
    "kernel_options_post":"",
    "boot_files":[]
},
重启服务
systemctl restart cobblerd.service关于本文
由 Matt Lee 撰写, 采用 CC BY-NC 4.0 许可协议.